# 文章目录
- 一、什么是链表?
- 二、 单向链表的常见操作及封装
- 三、双向链表
- 四、双向链表的常见操作及封装
- 4.1 常见方法
- 4.2 append(data) 尾部追加元素
- 4.3 backwardString 向后遍历
- 4.4 fowardString 向前遍历
- 4.5 toString 方法
- 4.6 测试 append backwardString fowardString toString
- 4.7 insert(position,data) 插入到指定位置
- 4.8 get(position) 根据位置获取对应元素
- 4.9 indexOf(data) 根据元素返回对应位置
- 4.10 update(position,data) 更新指定位置的数据
- 4.11 removeAt(position) 根据位置信息删除对应节点
- 4.12 remove(data) 根据元素删除
- 4.13 其他方法的实现
# 一、什么是链表?
链表和数组一样,可以用来存储一系列的元素,但是链表和数组的实现机制完全不同。
# 1.1 链表与数组的优差别
下面来简单看一下数组与链表的 差别

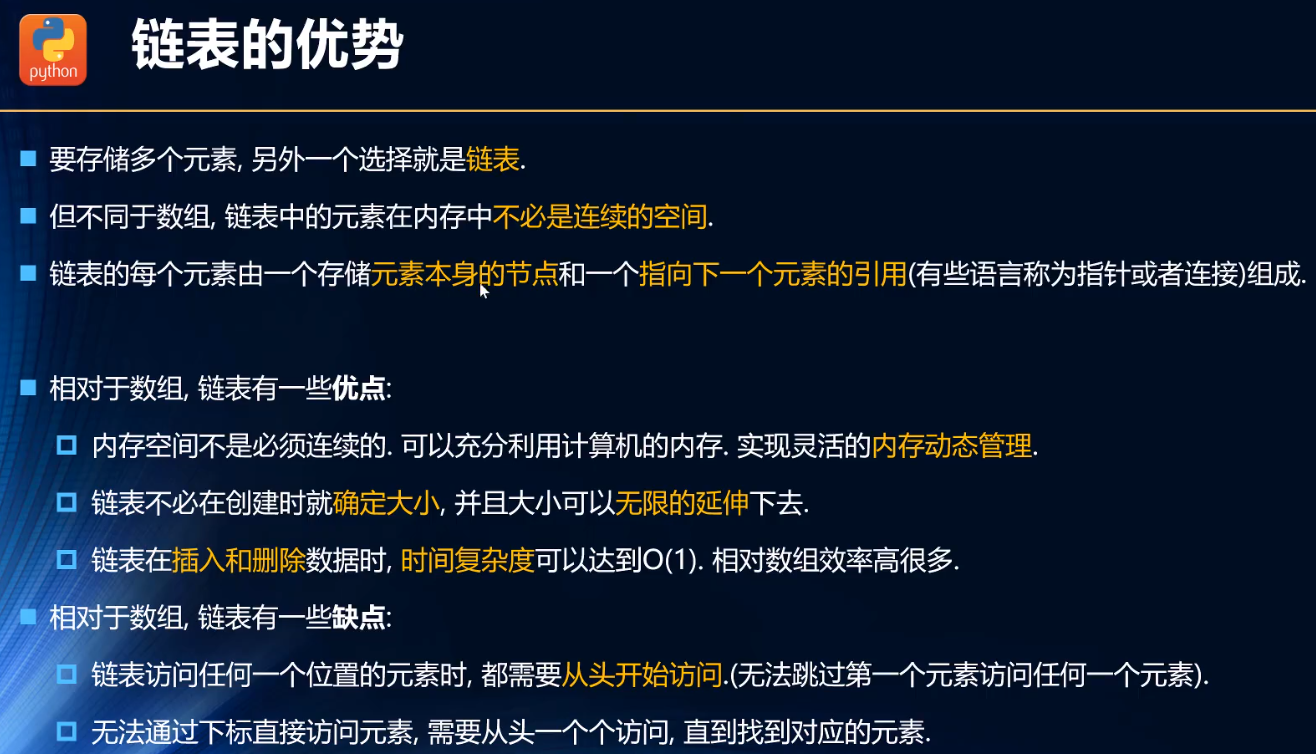
数组缺点总结: 1、扩容 2、中间插入成本高
链表缺点总结: 1、每次访问都是从头访问
数组在通过下标 修改或获取 元素效率更高。
链表在 插入或删除 时效率更高。
# 1.2 链表结构图示
抽象方式:
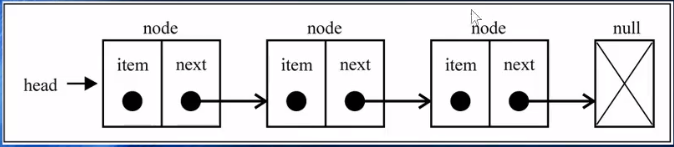
每个链表的开头都需要一个 head 属性,指向第一个节点。

# 二、 单向链表的常见操作及封装
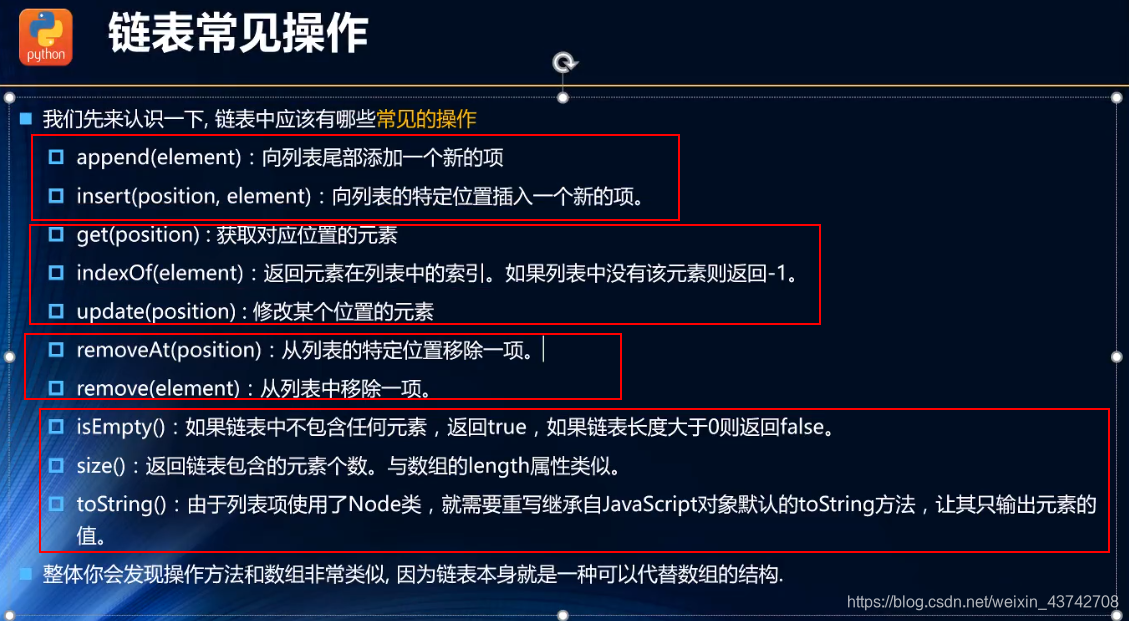
# 2.1 append(data) 尾部追加
注意,添加时有两种情况:
链表本身为空,需要将head指向刚添加的节点链表本身不为空,需要将最后一个节点的next指向当前
// 封装链表类
function LinkedList() {
  // 内部类:节点类
  function Node(data) {
    this.data = data;
    this.next = null;
  }
  // 属性 head属性指向第一个节点
  this.head = null;
  // 当前链表的节点个数
  this.length = 0;

  // 1.追加方法
  LinkedList.prototype.append = function(data) {
    // 1.创建新节点
    let newNode = new Node(data);

    // 2.判断是否是第一个节点
    if (this.length == 0) {
      // 2.1 是,将head指向刚创建的节点
      this.head = newNode;
    } else {
      // 2.2 不是,找到最后一个节点
      let current = this.head;
      while (current.next) {
        current = current.next;
      }
      // 把最后一个节点的next指向新创建的节点
      current.next = newNode;
    }
    this.length += 1;
  };
}
1
2
3
4
5
6
7
8
9
10
11
12
13
14
15
16
17
18
19
20
21
22
23
24
25
26
27
28
29
30
31
32
33
2
3
4
5
6
7
8
9
10
11
12
13
14
15
16
17
18
19
20
21
22
23
24
25
26
27
28
29
30
31
32
33
# 2.2 toString 方法
注意:调佣 alert 方法,如果重写了原形上的 toString 方法,则 alert 会调用重写的 toString 方法。
// 2.toSring方法
LinkedList.prototype.toString = function() {
  let current = this.head;
  let listString = "";

  // 2.循环获取一个个的节点
  while (current) {
    listString += current.data + " ";
    current = current.next;
  }

  return listString;
};

// 2.追加方法
list.append("a");
list.append("c");
list.append("b");
list.append("d");
alert(list);
console.log(list);
1
2
3
4
5
6
7
8
9
10
11
12
13
14
15
16
17
18
19
20
21
2
3
4
5
6
7
8
9
10
11
12
13
14
15
16
17
18
19
20
21
# 2.3 insert(position,data) 插入方法
情况一:插入到 position 等于 0 的位置
情况二:position 插入到大于 1 的位置
// 3.insert方法
LinkedList.prototype.insert = function(position, data) {
  // 1.对我们的position进行越界判断 (小于0,大于当前长度)
  if (position < 0 || position > this.length) return false;

  // 2.创建节点
  let newNode = new Node(data);

  // 3.判断插入的位置是否是第一个
  if (position == 0) {
    // 先让新插入节点的指针指向原来的第一个节点
    newNode.next = this.head;
    // 再让head指向新插入的节点
    this.head = newNode;
  } else {
    let index = 0;
    let current = this.head;
    let previous = null;
    // 当循环停止,current就是position处的节点,previous是current的前面一个
    while (index++ < position) {
      previous = current;
      current = current.next;
    }
    // 前一个链接新的,新的链接后边的
    previous.next = newNode;
    newNode.next = current;
  }

  this.length += 1;
  return true;
};
1
2
3
4
5
6
7
8
9
10
11
12
13
14
15
16
17
18
19
20
21
22
23
24
25
26
27
28
29
30
31
2
3
4
5
6
7
8
9
10
11
12
13
14
15
16
17
18
19
20
21
22
23
24
25
26
27
28
29
30
31
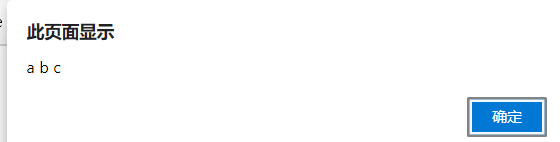
测试:
// 测试代码
// 1.创建LinkedList
let list = new LinkedList();

// 2.追加方法
list.append("a");
list.append("c");

// 3.插入方法
list.insert(1, "b");
alert(list);
console.log(list);
1
2
3
4
5
6
7
8
9
10
11
12
2
3
4
5
6
7
8
9
10
11
12
效果:
# 2.4 get(position) 获取对应位置的数据
//4.get方法
LinkedList.prototype.get = function(position) {
  // 1.越界判断
  if (position < 0 || position >= this.length) return null;

  // 2.获取对应的数据
  let current = this.head;
  let index = 0;
  while (index++ < position) {
    current = current.next;
  }
  return current.data;
};
1
2
3
4
5
6
7
8
9
10
11
12
13
2
3
4
5
6
7
8
9
10
11
12
13
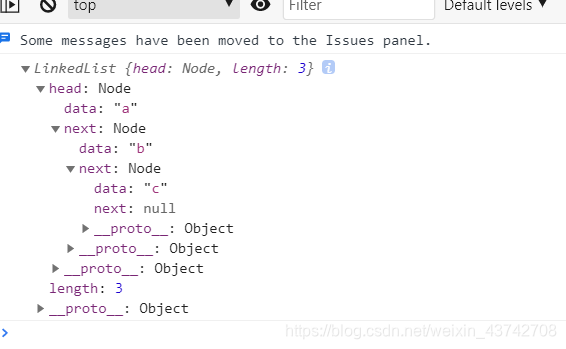
测试代码:
// 测试代码
// 1.创建LinkedList
let list = new LinkedList();

// 2.追加方法
list.append("a");
list.append("c");

// 3.插入方法
list.insert(1, "b");
console.log(list);
console.log(list.get(2));
1
2
3
4
5
6
7
8
9
10
11
12
2
3
4
5
6
7
8
9
10
11
12

# 2.5 indexOf(data) 返回元素在链表中的索引,没有返回 -1
// 5.indexOf
LinkedList.prototype.indexOf = function(data) {
  // 5.1定义变量
  let current = this.head;
  let index = 0;

  // 5.2 开始查找
  while (current) {
    if (current.data == data) {
      return index;
    }
    current = current.next;
    index += 1;
  }
  // 找到最后都没找到返回 -1
  return -1;
};
1
2
3
4
5
6
7
8
9
10
11
12
13
14
15
16
17
2
3
4
5
6
7
8
9
10
11
12
13
14
15
16
17
测试结果:
# 2.6 update(position,newData) 根据位置信息,修改对应的元素
// 6.update
LinkedList.prototype.update = function(position, newData) {
  // 1.越界判断
  if (position < 0 || position >= this.length) return false;

  // 2.查找正确的节点
  let current = this.head;
  let index = 0;
  while (index++ < position) {
    current = current.next;
  }
  // 3.将position位置节点的data修改为newData
  current.data = newData;

  return true;
};
1
2
3
4
5
6
7
8
9
10
11
12
13
14
15
16
2
3
4
5
6
7
8
9
10
11
12
13
14
15
16
测试代码:
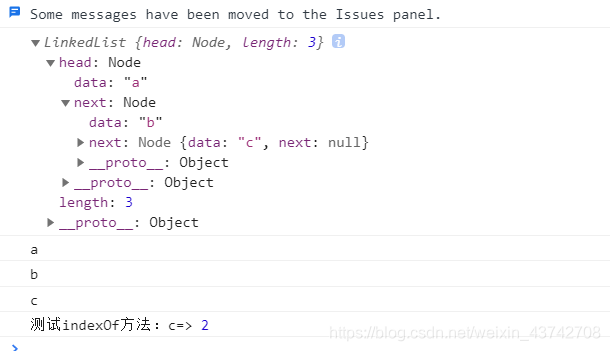
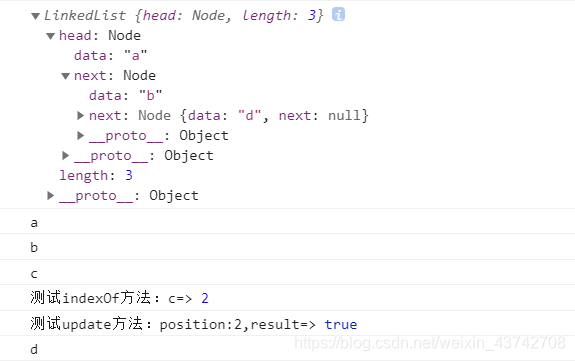
// 测试代码
// 1.创建LinkedList
let list = new LinkedList();

// 2.测试追加方法
list.append("a");
list.append("c");

// 3.测试插入方法
list.insert(1, "b");

// 4.测试toString方法
alert(list);

console.log(list);
console.log(list.get(0));
console.log(list.get(1));
console.log(list.get(2));

// 5.测试indexOf方法
console.log("测试indexOf方法:c=>", list.indexOf("c"));
// 6.测试update方法
console.log("测试update方法:position:2,result=>", list.update(2, "d")); //true
console.log(list.get(2)); // d
1
2
3
4
5
6
7
8
9
10
11
12
13
14
15
16
17
18
19
20
21
22
23
24
2
3
4
5
6
7
8
9
10
11
12
13
14
15
16
17
18
19
20
21
22
23
24
测试结果:
# 2.7 removeAt(position) 根据位置信息删除
情况一:删除 position 位置等于 0 的
情况二:删除 position 非 0 的
// 7.removeAt
LinkedList.prototype.removeAt = function(position) {
  // 1.越界判断
  if (position < 0 || position >= this.length) return null;

  // 2.判断是否删除的是第一个Node
  let current = this.head; // 当前

  if (position == 0) {
    this.head = this.head.next;
  } else {
    let index = 0;
    let previous = null; //前一个
    while (index++ < position) {
      previous = current;
      current = current.next;
    }
    // 前一个的next指向后一个节点的next
    previous.next = current.next;

    // 3.length减一
    this.length -= 1;
    return current.data;
  }
};
1
2
3
4
5
6
7
8
9
10
11
12
13
14
15
16
17
18
19
20
21
22
23
24
25
2
3
4
5
6
7
8
9
10
11
12
13
14
15
16
17
18
19
20
21
22
23
24
25
测试代码:
// 测试代码
// 1.创建LinkedList
let list = new LinkedList();

// 2.测试追加方法
list.append("a");
list.append("c");

// 3.测试插入方法
list.insert(1, "b");

// 4.测试toString方法
alert(list);

console.log(list);
console.log(list.get(0));
console.log(list.get(1));
console.log(list.get(2));

// 5.测试indexOf方法
console.log("测试indexOf方法:c=>", list.indexOf("c"));
// 6.测试update方法
console.log("测试update方法:position:2,result=>", list.update(2, "d")); //true
console.log(list.get(2)); // d

// 7.测试removeAt方法
console.log(list.removeAt(2));
1
2
3
4
5
6
7
8
9
10
11
12
13
14
15
16
17
18
19
20
21
22
23
24
25
26
27
2
3
4
5
6
7
8
9
10
11
12
13
14
15
16
17
18
19
20
21
22
23
24
25
26
27
测试效果:

# 2.8 remove(data) 根据元素删除
LinkedList.prototype.remove = function(data) {
  // 1.根据data 获取对应的位置
  let position = this.indexOf(data);
  // 2.根据位置信息,删除节点  不用考虑-1,因为 removeAt方法内,做了越界判断
  return this.removeAt(position);
};
1
2
3
4
5
6
2
3
4
5
6
测试代码:
// 8.测试remove方法
console.log("测试remove方法:删除b=>", list.remove("b"));
1
2
2
测试结果:
# 2.9 isEmpty 判断链表是否为空
LinkedList.prototype.isEmpty = function() {
  return this.length == 0;
};
1
2
3
2
3
# 2.10 size 返回链表个数
// 10. size 返回链表节点的个数
LinkedList.prototype.size = function() {
  return this.length;
};
1
2
3
4
2
3
4
# 2.11 单向链表完整代码
<!DOCTYPE html>
<html lang="en">

<head>
  <meta charset="UTF-8">
  <meta http-equiv="X-UA-Compatible" content="IE=edge">
  <meta name="viewport" content="width=device-width, initial-scale=1.0">
  <title>单向链表</title>
</head>

<body>
  <script>
    // 封装链表类
    function LinkedList() {
      // 内部类:节点类
      function Node(data) {
        this.data = data
        this.next = null
      }
      // 属性 head属性指向第一个节点
      this.head = null
      this.length = 0

      // 1.追加方法
      LinkedList.prototype.append = function (data) {
        // 1.创建新节点
        let newNode = new Node(data)

        // 2.判断是否是第一个节点
        if (this.length == 0) {
          // 2.1 是,将head指向刚创建的节点
          this.head = newNode
        } else {
          // 2.2 不是,找到最后一个节点
          let current = this.head
          while (current.next) {
            current = current.next
          }
          // 把最后一个节点的next指向新创建的节点
          current.next = newNode
        }
        this.length += 1
      }

      // 2.toSring方法
      LinkedList.prototype.toString = function () {
        let current = this.head
        let listString = ''

        // 2.循环获取一个个的节点
        while (current) {
          listString += current.data + ' '
          current = current.next
        }

        return listString
      }

      // 3.insert方法
      LinkedList.prototype.insert = function (position, data) {
        // 1.对我们的position进行越界判断 (小于0,大于当前长度)
        if (position < 0 || position > this.length) return false

        // 2.创建节点
        let newNode = new Node(data)

        // 3.判断插入的位置是否是第一个
        if (position == 0) {
          // 先让新插入节点的指针指向原来的第一个节点
          newNode.next = this.head
          // 再让head指向新插入的节点
          this.head = newNode
        } else {
          let index = 0
          let current = this.head
          let previous = null
          // 当循环停止,current就是position处的节点,previous是current的前面一个
          while (index++ < position) {
            previous = current
            current = current.next
          }
          // 前一个链接新的,新的链接后边的
          previous.next = newNode
          newNode.next = current
        }

        this.length += 1
        return true
      }

      // 4.get方法 获取对应位置的数据
      LinkedList.prototype.get = function (position) {
        // 1.越界判断
        if (position < 0 || position >= this.length) return null

        // 2.获取对应的数据
        let current = this.head
        let index = 0
        while (index++ < position) {
          current = current.next
        }
        return current.data
      }

      // 5.indexOf 返回匹配到的元素的位置
      LinkedList.prototype.indexOf = function (data) {
        // 5.1定义变量
        let current = this.head
        let index = 0

        // 5.2 开始查找
        while (current) {
          if (current.data == data) {
            return index
          }
          current = current.next
          index += 1
        }
        // 没找到返回 -1
        return -1
      }

      // 6.update 更新某一个位置的数据
      LinkedList.prototype.update = function (position, newData) {
        // 1.越界判断
        if (position < 0 || position >= this.length) return false

        // 2.查找正确的节点
        let current = this.head
        let index = 0
        while (index++ < position) {
          current = current.next
        }
        // 3.将position位置节点的data修改为newData
        current.data = newData

        return true
      }

      // 7.removeAt 根据位置删除元素
      LinkedList.prototype.removeAt = function (position) {
        // 1.越界判断
        if (position < 0 || position >= this.length) return null

        // 2.判断是否删除的是第一个Node
        let current = this.head // 当前

        if (position == 0) {
          this.head = this.head.next
        } else {
          let index = 0
          let previous = null //前一个
          while (index++ < position) {
            previous = current
            current = current.next
          }
          // 前一个的next指向后一个节点的next
          previous.next = current.next

          // 3.length减一
          this.length -= 1
          return current.data
        }
      }

      // 8.remove 根据元素删除
      LinkedList.prototype.remove = function (data) {
        // 1.根据data 获取对应的位置
        let position = this.indexOf(data)
        // 2.根据位置信息,删除节点  不用考虑-1,因为 removeAt方法内,做了越界判断
        return this.removeAt(position)
      }

      // 9.isEmpty 判断链表是否为空
      LinkedList.prototype.isEmpty = function () {
        return this.length == 0
      }

      // 10. size 返回链表节点的个数
      LinkedList.prototype.size = function () {
        return this.length
      }
    }

    // 测试代码
    // 1.创建LinkedList
    let list = new LinkedList()

    // 2.测试追加方法
    list.append('a')
    list.append('c')

    // 3.测试插入方法
    list.insert(1, 'b')

    // 4.测试toString方法
    alert(list);

    console.log(list);
    console.log(list.get(0));
    console.log(list.get(1));
    console.log(list.get(2));

    // 5.测试indexOf方法
    console.log('测试indexOf方法:c=>', list.indexOf('c'));
    // 6.测试update方法
    console.log('测试update方法:position:2,result=>', list.update(2, 'd')); //true
    console.log(list.get(2)); // d

    // 7.测试removeAt方法
    console.log(list.removeAt(2));

    // 8.测试remove方法
    console.log('测试remove方法:删除b=>', list.remove('b'));
    // 9.测试isEmpty方法
    console.log(list.isEmpty());
    // 10.测试size方法
    console.log(list.size());
  </script>
</body>

</html>
1
2
3
4
5
6
7
8
9
10
11
12
13
14
15
16
17
18
19
20
21
22
23
24
25
26
27
28
29
30
31
32
33
34
35
36
37
38
39
40
41
42
43
44
45
46
47
48
49
50
51
52
53
54
55
56
57
58
59
60
61
62
63
64
65
66
67
68
69
70
71
72
73
74
75
76
77
78
79
80
81
82
83
84
85
86
87
88
89
90
91
92
93
94
95
96
97
98
99
100
101
102
103
104
105
106
107
108
109
110
111
112
113
114
115
116
117
118
119
120
121
122
123
124
125
126
127
128
129
130
131
132
133
134
135
136
137
138
139
140
141
142
143
144
145
146
147
148
149
150
151
152
153
154
155
156
157
158
159
160
161
162
163
164
165
166
167
168
169
170
171
172
173
174
175
176
177
178
179
180
181
182
183
184
185
186
187
188
189
190
191
192
193
194
195
196
197
198
199
200
201
202
203
204
205
206
207
208
209
210
211
212
213
214
215
216
217
218
219
220
221
222
# 三、双向链表
# 3.1 认识双向列表
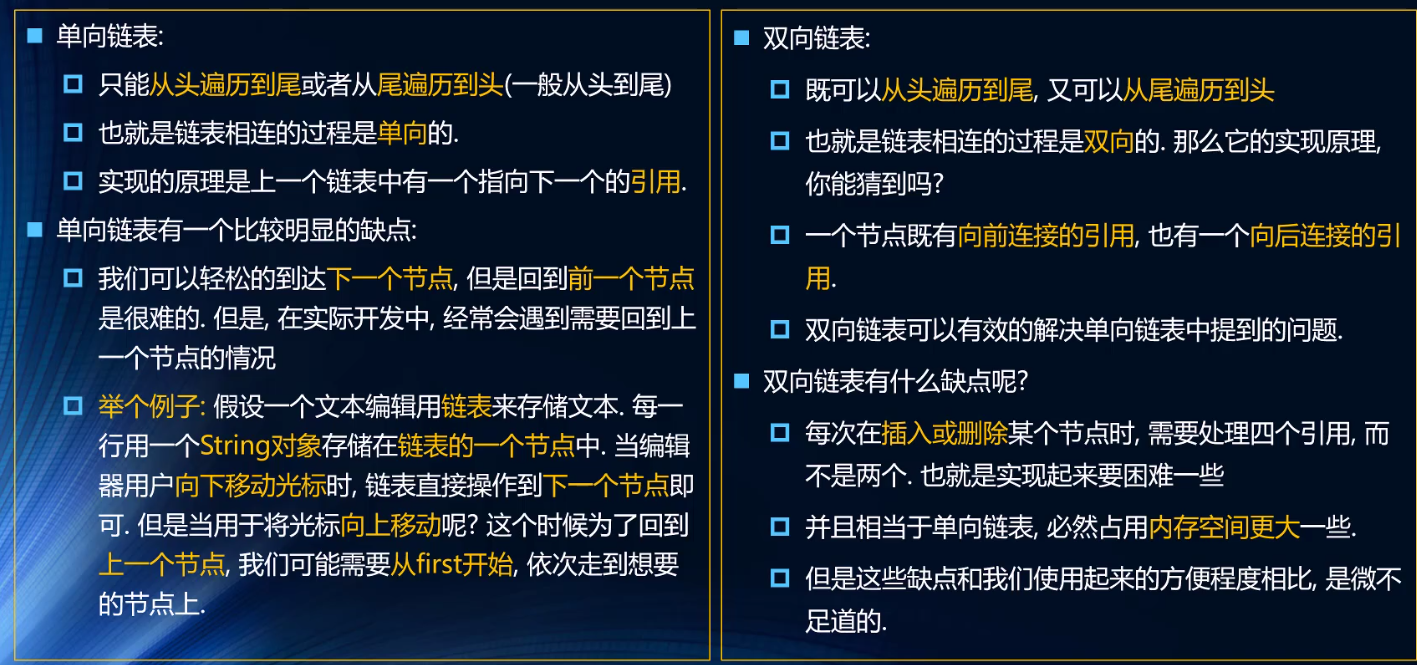
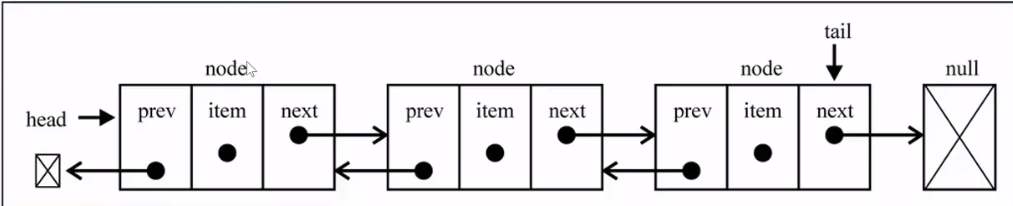
总结出双向链表的特点:
- 可以使用一个 head 和一个 tail 分别指向头部和尾部的节点
- 每个节点都由三部分组成前一个节点的指针(prev),保存的元素(item),后一个节点的指针 next)
- 双向链表的第一个节点的 prev 是 null
- 双向链表的最后的节点的 next 是 null
# 3.2 双向链表图示

# 3.3 链表结构封装
<script>
  // 封装双向链表
  function DoublyLinkedList() {
    // 1.内部类:节点类
    function (data) {
      this.data = data
      this.prev = null
      this.next = null
    }
    // 2.属性
    this.head = null //头
    this.tail = null //尾
    this.length = 0 //node个数

    // 3.常见的操作
  }
</script>
1
2
3
4
5
6
7
8
9
10
11
12
13
14
15
16
17
2
3
4
5
6
7
8
9
10
11
12
13
14
15
16
17
# 四、双向链表的常见操作及封装
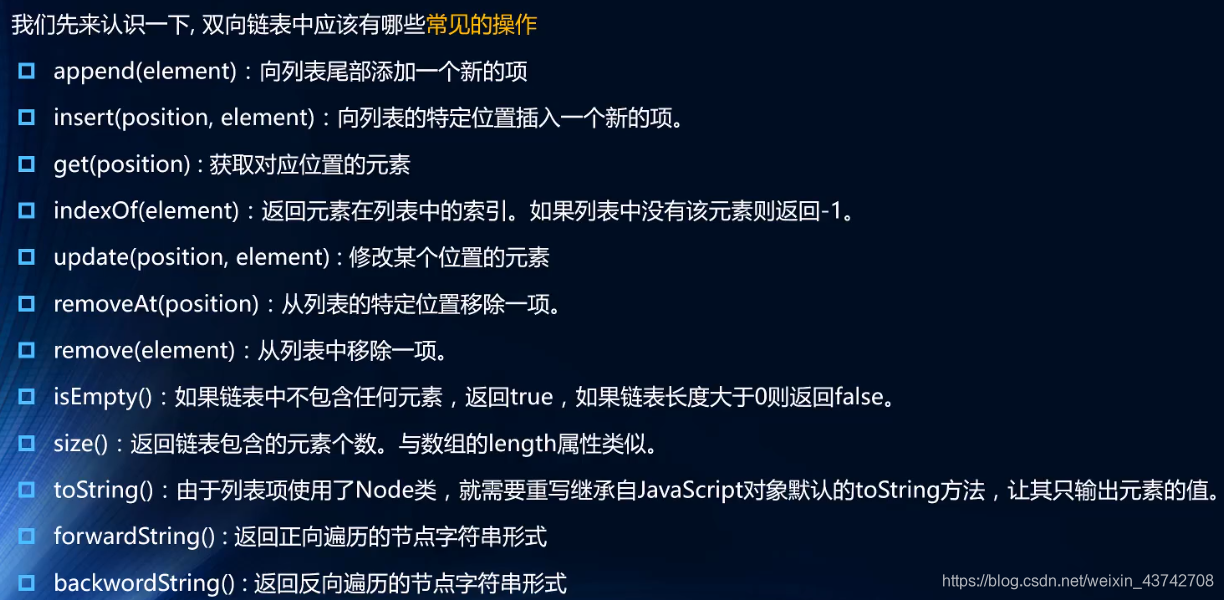
# 4.1 常见方法
# 4.2 append(data) 尾部追加元素
注意,添加时有两种情况:
判断链表是否为空链表本身不为空,需要将最后一个节点的next指向当前
function DoublyLinkedList() {
  // 1.内部类:节点类
  function DoublyNode(data) {
    this.data = data;
    this.prev = null;
    this.next = null;
  }
  // 2.属性
  this.head = null; //头
  this.tail = null; //尾
  this.length = 0; //node个数

  // 3.常见的操作

  // 1.append(data) 尾部追加
  DoublyLinkedList.prototype.append = function(data) {
    // 1.根据data创建节点
    let newNode = new DoublyNode(data);

    // 2.判断添加的是否为第一个节点
    if (this.length == 0) {
      this.head = newNode;
      this.tail = newNode;
    } else {
      // 新节点的prev指向 以前的tail
      newNode.prev = this.tail;
      // 以前的tail的next节点 指向newnode
      this.tail.next = newNode;
      // 新节点变为最后一个节点
      this.tail = newNode;
    }
    // 3.改变length的长度
    this.length += 1;
  };
}
1
2
3
4
5
6
7
8
9
10
11
12
13
14
15
16
17
18
19
20
21
22
23
24
25
26
27
28
29
30
31
32
33
34
35
2
3
4
5
6
7
8
9
10
11
12
13
14
15
16
17
18
19
20
21
22
23
24
25
26
27
28
29
30
31
32
33
34
35
# 4.3 backwardString 向后遍历
DoublyLinkedList.prototype.backwardString = function() {
  let current = this.head;
  let resultString = "";

  // 1.依次向后遍历,获取每一个节点
  while (current) {
    resultString += current.data + " ";
    current = current.next;
  }
  return resultString;
};
1
2
3
4
5
6
7
8
9
10
11
2
3
4
5
6
7
8
9
10
11
# 4.4 fowardString 向前遍历
DoublyLinkedList.prototype.fowardString = function() {
  let current = this.tail;
  let resultString = "";
  // 1.依次向后遍历
  while (current) {
    resultString += current.data + " ";
    current = current.prev;
  }
  return resultString;
};
1
2
3
4
5
6
7
8
9
10
2
3
4
5
6
7
8
9
10
# 4.5 toString 方法
DoublyLinkedList.prototype.toString = function() {
  return this.backwardString();
};
1
2
3
2
3
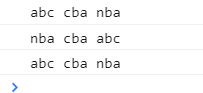
# 4.6 测试 append backwardString fowardString toString
测试代码:
// 测试代码
const list = new DoublyLinkedList();

// 1.测试append方法
list.append("abc");
list.append("cba");
list.append("nba");

// 2.测试转成字符串的方法
console.log(list.backwardString());
console.log(list.fowardString());
console.log(list.toString());
1
2
3
4
5
6
7
8
9
10
11
12
2
3
4
5
6
7
8
9
10
11
12
测试结果:
# 4.7 insert(position,data) 插入到指定位置
注意以下几种情况:
链表是空的 (head tail)插入到链表开头 (head 新节点 绑定尾 旧节点绑定头)插入到链表结尾 (tail 新节点绑定头 旧节点绑定尾)插入到链表中间 (新节点绑定头尾 旧节点的prev.next 旧节点的.prev)
DoublyLinkedList.prototype.insert = function(position, data) {
  // 1.越界判断
  if (position < 0 || position > this.length) return false;

  // 2.根据data创建节点
  let newNode = new DoublyNode(data);

  // 3.找到正确的位置
  if (this.length == 0) {
    this.head = newNode;
    this.tail = newNode;
  } else {
    if (position == 0) {
      // 3.1 判断position是否为0
      this.head.prev = newNode;
      newNode.next = this.head;
      this.head = newNode;
    } else if (position == this.length) {
      // 3.2 position == length
      console.log("position: ", position);
      newNode.prev = this.tail;
      console.log("this.tail: ", this.tail);
      this.tail.next = newNode;
      this.tail = newNode;
    } else {
      let current = this.head;
      let index = 0;
      while (index++ < position) {
        current = current.next;
      }
      // 3.3 修改指针
      newNode.prev = current.prev;
      newNode.next = current;
      current.prev.next = newNode;
      current.prev = newNode;
    }
  }

  // 4. length +1
  this.length += 1;
  return true;
};
1
2
3
4
5
6
7
8
9
10
11
12
13
14
15
16
17
18
19
20
21
22
23
24
25
26
27
28
29
30
31
32
33
34
35
36
37
38
39
40
41
42
2
3
4
5
6
7
8
9
10
11
12
13
14
15
16
17
18
19
20
21
22
23
24
25
26
27
28
29
30
31
32
33
34
35
36
37
38
39
40
41
42
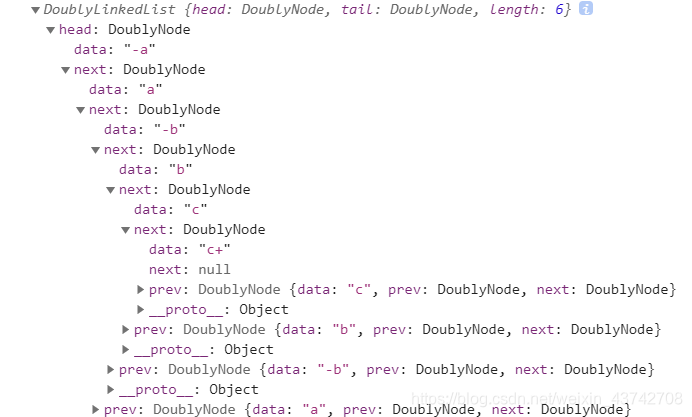
测试代码:
// 测试代码
const list = new DoublyLinkedList();
// 1.测试append方法
list.append("a");
list.append("b");
list.append("c");
// 2.测试转成字符串的方法
console.log(list.backwardString());
console.log(list.toString());
console.log(list.fowardString());
// 3.测试insert方法
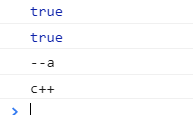
list.insert(0, "-a");
list.insert(2, "-b");
list.insert(5, "c+");
console.log(list);
1
2
3
4
5
6
7
8
9
10
11
12
13
14
15
16
17
18
2
3
4
5
6
7
8
9
10
11
12
13
14
15
16
17
18
测试结果:
# 4.8 get(position) 根据位置获取对应元素
DoublyLinkedList.prototype.get = function(position) {
  // 1.越界判断
  if (position < 0 || position >= this.length) return null;

  // 2.获取元素
  // 优化算法 判断从前往后找 还是从后往前找
  if (this.length / 2 > position) {
    // 前往后
    let current = this.head;
    let index = 0;
    while (index++ < position) {
      current = current.next;
    }
  } else {
    // 后往前
    let current = this.tail;
    let index = this.length - 1;
    while (index-- > position) {
      current = current.prev;
    }
  }
  return current.data;
};
1
2
3
4
5
6
7
8
9
10
11
12
13
14
15
16
17
18
19
20
21
22
23
2
3
4
5
6
7
8
9
10
11
12
13
14
15
16
17
18
19
20
21
22
23
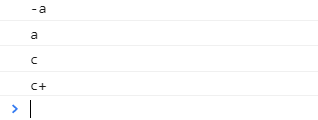
测试代码:
// ... 沿用上边全部测试代码
// 4.测试get方法
console.log(list.get(0));
console.log(list.get(1));
console.log(list.get(4));
console.log(list.get(5));
1
2
3
4
5
6
2
3
4
5
6
测试结果:
# 4.9 indexOf(data) 根据元素返回对应位置
DoublyLinkedList.prototype.indexOf = function(data) {
  let current = this.head;
  let index = 0;
  // 1.查找和data相同的节点
  while (current) {
    if (current.data == data) {
      return index;
    }
    current = current.next;
    index += 1;
  }
  return -1;
};
1
2
3
4
5
6
7
8
9
10
11
12
13
2
3
4
5
6
7
8
9
10
11
12
13
测试代码:
// ... 沿用上边全部测试代码
console.log(list.indexOf("-a"));
console.log(list.indexOf("c+"));
1
2
3
2
3
测试结果:
# 4.10 update(position,data) 更新指定位置的数据
注意:这里可以做一个优化,判断是从前往后遍历,还是从后往前遍历
DoublyLinkedList.prototype.update = function(position, newData) {
  // 1.越界判断
  if (position < 0 || position >= this.length) return false;

  // 2.寻找正确的节点
  // 算法优化 判断是从前往后,还是从后往前
  let current = null;
  if (this.length / 2 > position) {
    // 前往后
    current = this.head;
    let index = 0;
    while (index++ < position) {
      current = current.next;
    }
  } else {
    // 后往前
    current = this.tail;
    let index = this.length - 1;
    while (index-- > position) {
      current = current.prev;
    }
  }

  // 3.修改找到的节点信息
  current.data = newData;
  return true;
};
1
2
3
4
5
6
7
8
9
10
11
12
13
14
15
16
17
18
19
20
21
22
23
24
25
26
27
2
3
4
5
6
7
8
9
10
11
12
13
14
15
16
17
18
19
20
21
22
23
24
25
26
27
测试代码:
// ... 沿用上边全部测试代码
console.log(list.update(0, "--a"));
console.log(list.update(5, "c++"));
console.log(list.get(0));
console.log(list.get(5));
1
2
3
4
5
2
3
4
5
测试结果:
# 4.11 removeAt(position) 根据位置信息删除对应节点
注意删除操作要考虑以下几种情况:
只有一个节点删除第一个节点删除最后一个节点删除中间的节点
DoublyLinkedList.prototype.removeAt = function(position) {
  // 1.越界判断
  if (position < 0 || position >= this.length) return false;

  // 2.判断是否只有一个节点
  let current = this.head;

  if (this.length == 1) {
    this.head = null;
    this.tail = null;
  } else {
    if (position == 0) {
      // 删除的是第一个节点
      this.head.next.prev = null;
      this.head = this.head.next;
    } else if (position == this.length - 1) {
      //删除的是最后的节点
      current = this.tail;
      this.tail.prev.next = null;
      this.tail = this.tail.prev;
    } else {
      let index = 0;
      while (index++ < position) {
        current = current.next;
      }
      //函数生命周期结束后,没有被引用的变量都会被GC回收 以达到删除的目的
      current.prev.next = current.next;
      current.next.prev = current.prev;
    }
  }
  // 3.length减一
  this.length -= 1;
  return current.data;
};
1
2
3
4
5
6
7
8
9
10
11
12
13
14
15
16
17
18
19
20
21
22
23
24
25
26
27
28
29
30
31
32
33
34
2
3
4
5
6
7
8
9
10
11
12
13
14
15
16
17
18
19
20
21
22
23
24
25
26
27
28
29
30
31
32
33
34
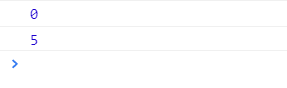
测试代码:
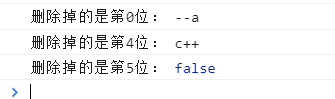
// ... 沿用上边全部测试代码
console.log("删除掉的是第0位:", list.removeAt(0));
console.log("删除掉的是第4位:", list.removeAt(4));
console.log("删除掉的是第5位:", list.removeAt(5));
1
2
3
4
2
3
4
测试结果:
# 4.12 remove(data) 根据元素删除
DoublyLinkedList.prototype.remove = function(data) {
  // 1.根据data获取下标值
  let index = this.indexOf(data);

  // 2.根据 index 删除元素
  return this.removeAt(index);
};
1
2
3
4
5
6
7
2
3
4
5
6
7
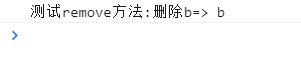
测试代码:
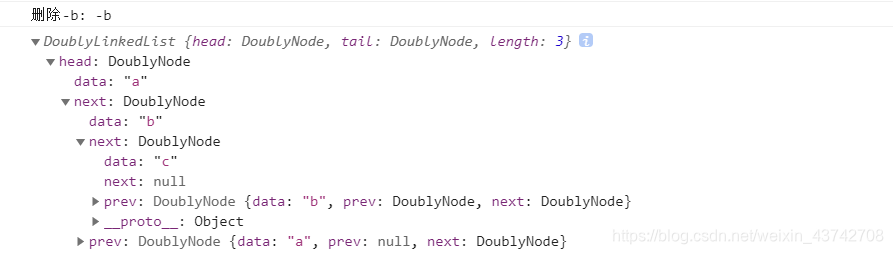
// ... 沿用上边全部测试代码
console.log("删除-b:", list.remove("-b"));
console.log(list);
1
2
3
2
3
测试结果:
# 4.13 其他方法的实现
// 9.isEmpty
DoublyLinkedList.prototype.isEmpty = function() {
  return this.length == 0;
};

// 10. size
DoublyLinkedList.prototype.size = function() {
  return this.length;
};

// 11.获取链表的第一个元素
DoublyLinkedList.prototype.getHead = function() {
  return this.head;
};
// 11.获取链表的最后一个元素
DoublyLinkedList.prototype.getTail = function() {
  return this.tail;
};
1
2
3
4
5
6
7
8
9
10
11
12
13
14
15
16
17
18
2
3
4
5
6
7
8
9
10
11
12
13
14
15
16
17
18
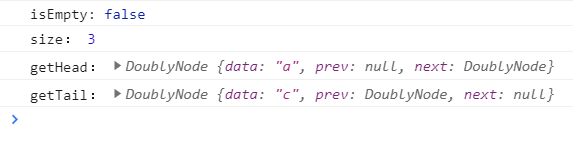
测试代码:
// 9.测试 isEmpty
console.log("isEmpty:", list.isEmpty());
// 10.测试 size
console.log("size:", list.size());
// 11.测试 getHead
console.log("getHead:", list.getHead());
// 12.测试 getTail
console.log("getTail:", list.getTail());
1
2
3
4
5
6
7
8
2
3
4
5
6
7
8
测试结果: